Table
Display Settings
The Table Display Settings
dialog allows you to save the columns that are displayed,
the width of the columns,
the order in which
columns are displayed, the column on which the records
are sorted, how data is grouped
& aggregated, if data
is to be condensed
on the report, and the number
of items displayed on a page.
You must use the Table Display Settings
window to select which columns are displayed, whether groupings are to
be combined in the report, and how data is to be aggregated, but most
of the rest are easier to change in the grid itself. Once you've changed
them in the grid, you can then save
the arrangement as your default using the Table Display Settings window.
Once you've set up and saved these items, the grid will be arranged
in that way whenever you log onto the system.
Note: This option doesn't include
any filters you've applied.
You can also edit
and remove
your Table Display Settings.
All users have access to the
Table Display Settings dialog.
Only users with the Enhanced Reporting Module are able to save settings
with filters and report setup
options using the Save Grid Settings
dialog — for light or premium
tier.
Save
table display settings
Saving the table display settings saves only
the way columns are arranged and the number of items displayed on a page;
it doesn't save any filters you
may have applied. It's useful if you want to see the grid arranged the
same way each time you open it.
Once you have the
grid arranged, click the Display
Settings button  in
the upper right-hand toolbar. The Table Display
Settings window opens.
in
the upper right-hand toolbar. The Table Display
Settings window opens.
Make any additional
changes in the Table Display Settings
window.
Click the User: Store Settings link in the
lower left corner.
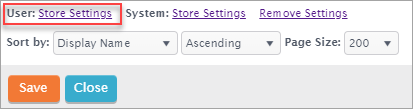
The settings are saved and you're returned to the grid.
These settings become your default, and you may return to them at any
time by selecting Reset All Settings
to My Default from the  menu.
menu.
Note: You may also store the
settings for the system if you have admin rights. Then the window will
be arranged in the manner you've designated whenever any user logs onto
the system.
Return
to the top
Edit
table display settings
Make the desired
changes to the arrangement in the grid.
Then click the Display
Settings button in the upper right-hand toolbar.
The Table
Display Settings window opens.
Make any additional
changes in the Table Display Settings
window.
Click the User: Store Settings link in the
lower left corner.
The settings are saved and you're returned to the grid.
Return
to the top
Remove
table display settings
To remove the table
display settings, click the Display Settings button in the upper right-hand
toolbar. The Table
Display Settings window opens.
Click the Remove Settings link beside the
User: Store Settings link
in the lower left corner.
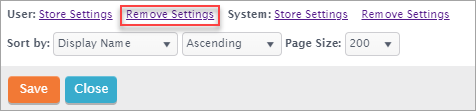
The settings are removed, and the grid will open with the system default
settings the next time the user logs onto the system.
Note: You may also remove the
settings for the system if you have admin rights. Then the window will
then be arranged with the system default settings whenever any user logs
onto the system.
Return
to the top
Return to Navigation Overview