Select Approval Process, then Approvers from the Administration menu, and the Approvers window opens.
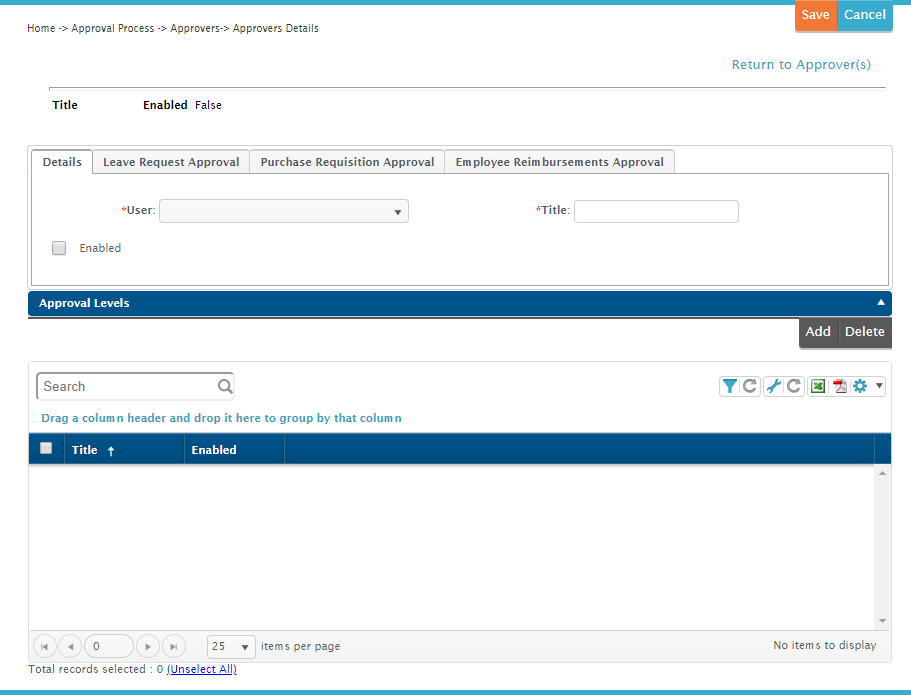
Click the Add button, and the Approvers Details window opens.
Complete the Details tab fields as described.
Select a person from the Users pull-down list. Note: Users are added to the system in Administration > Security > Manage Users.
Enter a Title for this approver. Make the title general, since the person who fulfills this role may change over time. You may want to use a description that includes the name of an approval level, but also differentiates from other approvers in that level. For example, if one of your approval levels is Principal, you could use include the abbreviation for a school name in the title — NHS Principal.
Click the Enabled box to make this approver available to the approval process.
Add an Approval Level. Note: You can add this approver to an approval level in this window or the Approval Levels window. Note: The approval level on the Details tab will be copied to the other tabs.
Click the Add button below the Approval Levels grid, and the Select Approval Level popup window opens.
Select an approval level from the pull-down list, and click Save.
Click the Save button to save the approver.
Click on the Leave Request Approval tab, and complete the fields as described.
Enabled: Check the box to make this approver available to the leave request approval process.
Backup Approver: Select an approver as a backup for times when this approver isn't available.
Approver Restrictions: Complete one or more of these fields if you want to place restrictions on this approver.
Site: Select the site for which this person can approve leave requests.
Department: Select the department for which this person can approve leave requests.
Leave Type: Select the leave type that this person can approve.
Click on the Job Requisition Approval tab, and complete the fields as described.
Enabled: Check the box to make this approver available to the job requisition approval process.
Backup Approver: Select an approver as a backup for times when this approver isn't available.
Approver Restrictions: Complete one or more of these fields if you want to place restrictions on this approver.
Site: Select the site for which this person can approve job reqs.
Department: Select the department for which this person can approve job reqs.
Amount: Select the operation, and enter an amount — for example, entering less than 25,000.00 would mean that this user could only approve job reqs valued at less than $25,000.00.
Click on the Purchase Requisition Approval tab, and complete the fields as described.
Enabled: Check the box to make this approver available to the PR approval process.
Backup Approver: Select an approver as a backup for times when this approver isn't available.
Approver Restrictions: Complete one or more of these fields if you want to place restrictions on this approver.
Site: Select the site for which this person can approve PRs.
Department: Select the department for which this person can approve PRs.
Expression: Click the
 to open the Account Code Expression Assistant,
and select the accounts to which this approver will be restricted.
Click here
for instructions on using the Account Code Expression Assistant.
to open the Account Code Expression Assistant,
and select the accounts to which this approver will be restricted.
Click here
for instructions on using the Account Code Expression Assistant.
Amount: Select the operation, and enter an amount — for example, entering less than 2000.00 would mean that this user could only approve PRs valued at less than $2000.00.
Click on the Replenishment PR Approval tab, and complete the fields as described.
Enabled: Check the box to make this approver available to the replenishment PR approval process.
Backup Approver: Select an approver as a backup for times when this approver isn't available.
Approver Restrictions: Complete one or more of these fields if you want to place restrictions on this approver.
Site: Select the site for which this person can approve replenishment PRs.
Department: Select the department for which this person can approve replenishment PRs.
Amount: Select the operation, and enter an amount — for example, entering less than 2000.00 would mean that this user could only approve replenishment PRs valued at less than $2000.00.
Click on the Warehouse Requisition Approval tab, and complete the fields as described.
Enabled: Check the box to make this approver available to the warehouse requisition approval process.
Backup Approver: Select an approver as a backup for times when this approver isn't available.
Approver Restrictions: Complete one or more of these fields if you want to place restrictions on this approver.
Site: Select the site for which this person can approve warehouse requisitions.
Department: Select the department for which this person can approve warehouse requisitions.
Amount: Select the operation, and enter an amount — for example, entering less than 2000.00 would mean that this user could only approve warehouse requisitions valued at less than $2000.00.
Click on the Employee Reimbursements Approval tab, and complete the fields as described.
Enabled: Check the box to make this approver available to the employee reimbursement approval process.
Backup Approver: Select an approver as a backup for times when this approver isn't available.
Approver Restrictions: Complete one or more of these fields if you want to place restrictions on this approver.
Site: Select the site for which this person can approve employee reimbursements.
Department: Select the department for which this person can approve employee reimbursements.
Amount: Select the operation, and enter an amount — for example, entering less than 2000.00 would mean that this user could only approve employee reimbursements valued at less than $2000.00.
Expression: Click the
to open the Account Code Expression Assistant,
and select the accounts to which this approver will be restricted.
Click here
for instructions on using the Account Code Expression Assistant.
Click Save.